Administration
Working with Registry
In Exchange, there are two primary types of data that can be added to Registry, a service or a single layer. A service is two or more layers being added to the map at the same time, whereas a single layer is just an individual layer. The form is the same for either one, but you will need to have a relatively good understanding of your data in order to successfully insert your new record.
Currently, you can add the following services in Exchange:
- WMS - Web Map Service
- MapServer - ESRI Map Service
- ImageServer - ESRI Image Service
Add an individual record to CSW
Exchange users with administrator privileges are able to add CSW records through their Exchange webpage.
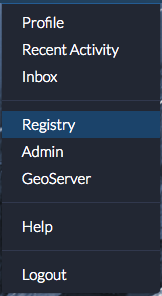
- Click on your user name in the toolbar. Select Registry from the drop-down menu to open the record form.
- A list of all items registered in Exchange will open, displaying their status as Complete, Unknown, Pending, or Error. Click the Register a new Record button in the top right corner to add a new record.
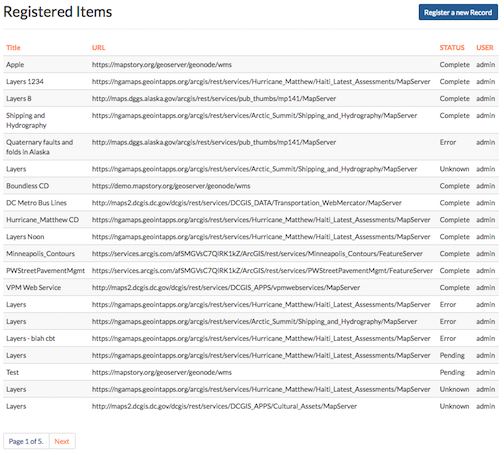
Click the Register a new Record button in the top right corner to add a new record.
- Complete the form with all of the necessary information.
Service URL - This is the URL address for the endpoint you are trying to add.
- Geoserver Example:
- https://mapstory.org/geoserver/geonode/wms
- ESRI MapServer Example:
- https://ngamaps.geointapps.org/arcgis/rest/services/Hurricane_Matthew/Bahamas_Latest_Damage_Assessments/MapServer
Note: Entering a MapServer url will auto-populate the available services such as WMSServer, WFSServer, FeatureServer.
- ESRI MapServer WMSserver Example:
- https://ngamaps.geointapps.org/arcgis/services/Hurricane_Matthew/Haiti_Latest_Assessments/MapServer/wmsserver
- ESRI ImageServer Example:
- https://gis.ngdc.noaa.gov/arcgis/rest/services/bag_hillshades/ImageServer
Title - This field should populate automatically. The title should be related to the data, but should also be unique enough to find when performing a search. You can change the title if you don’t want what auto-filled.
Layer Identifier - For ESRI MapServer Services, this field will be populated automatically; however, for any other service type, the name of the layer is required for this field.
Category - Select a category from the list that best describes your data.
Abstract - The abstract should provide a brief description of the data being added.
Agency - Where did the information come from? This should also auto-populate. If Exchange is unable to detect who the data belongs to from the endpoint, add the creator/agency information.
Contact Email - Please add your email address here.
Contact Phone - Please add a contact phone number here.
Gold - Select this checkbox if the data is NGA-approved content.
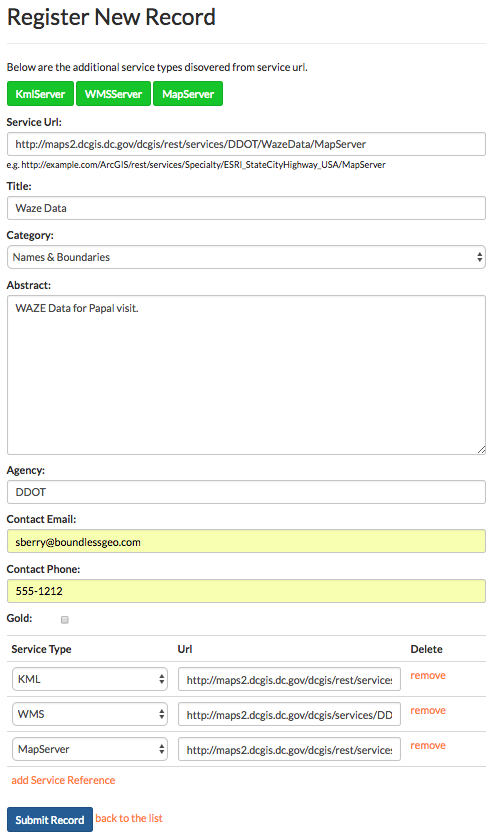
This is an example of a completed new record form.
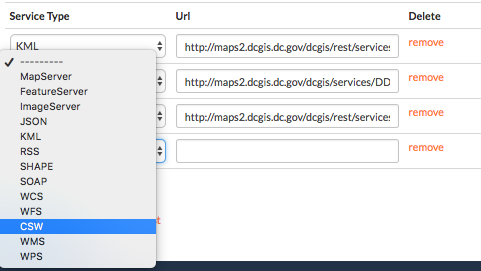
Additional services types (also called references) can be added by selecting the type from the drop down menu, and adding the URL. Service types discovered from the service URL are also listed at the top of the form.
- Click the Submit Record button to nominate record.
Note: Contact your Exchange administrator if the status does not display as Complete. They will need to take a look at your record via Django administration. Please see step 5 in the record administration section below.
For additional examples of records that have been successfully added in Exchange, please check out: CSW Examples
Verify the record
Once you submit your record, you will be directed to the Registered Items page. To verify the record status in Registry, you can search for it using the Exchange search field at the top of the page, or use the Add Layer function from your map.
CSW Record Administration
Add a CSW record
Records can also be added through the Django administration site. The form there requires you to add all data manually, and does not have an auto-populate function.
- Click on your user name in the toolbar. Select Admin from the drop-down menu to open the record form.
- Click Add next to CSW Records from the Core menu on the Django administration site.

- Complete the form with all of the necessary information. All of the fields on the form in bold are mandatory.
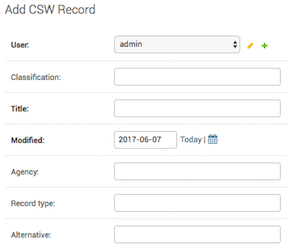
User - Select a user from the list to be the owner of the record.
Classification (optional) - Unless the data resides on a classified system, this will remain blank/UNCLASSIFIED.
Title - The title should be related to the data, but should also be unique enough to find when performing a search for data.
Modified - This field is filled in by default, but can be edited to match what is true for the data.
Agency - Where did the information come from?
Record Type - The type field denotes what kind of data is being added.
For the services listed below, you would use the following information:
- ESRI map server - ESRI:ArcGIS:MapServer
- ESRI image server - ESRI:ArcGIS:ImageServer
- WMS Services - dataset
Alternative - An ESRI service will number each of the layers (starting with zero), and when adding data from a service, the alternative field points to the id individual layer to be pulled from that server. For GeoServer OGC services, the value for the Alternative field can be pulled from the layer name which is a string that does not contain spaces. If you leave the space blank, all of the associated layers will be added.
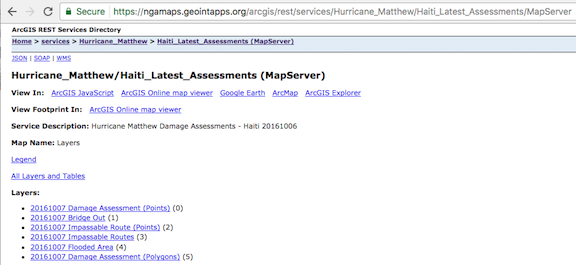
List of layers with ID’s for the MapServer. The layer ID for Bridge Out is ‘1’ as indicated by the value in the parenthesis.

Geoserver typically follows the format of <workspace>:<name>. The <name> portion is all that’s needed for the Alternative field.
Abstract - The abstract should provide a brief description of the data being added.
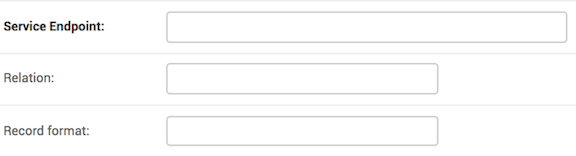
Service Endpoint - This is the URL address for the endpoint you are trying to add.
- Geoserver Example:
- https://mapstory.org/geoserver/geonode/wms
- ESRI MapServer Example:
- https://ngamaps.geointapps.org/arcgis/rest/services/Hurricane_Matthew/Bahamas_Latest_Damage_Assessments/MapServer
- ESRI MapServer WMSserver Example:
- https://ngamaps.geointapps.org/arcgis/services/Hurricane_Matthew/Haiti_Latest_Assessments/MapServer/wmsserver
- ESRI ImageServer Example:
- https://gis.ngdc.noaa.gov/arcgis/rest/services/bag_hillshades/ImageServer
Relation - This field is not currently used. It is used to associate records to one another
Record Format - This can vary depending on the kind of data being added. When registering a WMS service, format must be set to OGC:WMS.
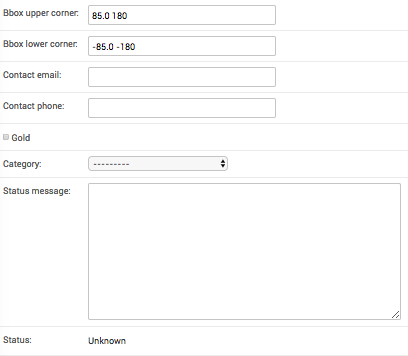
Bounding Box coordinates: Upper Corner - The bounding box defaults to an area that will cover what is being added. It is recommended to leave the default settings (85.0 180, -85.0 -180) unless you have specific requirements.
Bounding Box: Lower Corner - Same as above.
Contact Email - Please add your email address here.
Contact Phone - Please add a contact phone number here.
Gold - Select this checkbox if the data is NGA-approved content.
Category – Select a category from the drop-down menu.
- Once you have completed the form, click the Save button. You will be returned to the CSW record page, and notified that your record was added successfully.
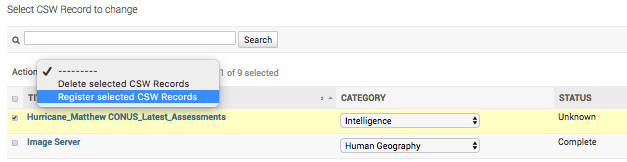
- A record added through the Django administration site will display the status as Unknown. Click the checkbox next to your record, and select Register Selected CSW Record from the Action menu. Click the Go button.
Delete a record
- Select CSW Records from the CORE menu on the Django administration site.
- Click the checkbox next to the record(s) to be deleted.
- Select Delete selected CSW Records from the Action menu, and click the :guilabel`Go` button.
- Click the Yes, I’m sure button to verify your selection.