Administration
Django Administration
Exchange users with administrator privileges are able to maintain site setting through the Django Site Administration page. Here you can manage user accounts, content, and system settings.
To access the Django administration site, log in to Exchange using your administrator credentials, and select Admin in the profile drop down menu. You will be directed to the Django administration site.

Accounts
This section covers how to add, modify and delete Exchange user accounts. All of the options in this section are available through the Account menu on the Django Site administration page.

Account creation
- To create an Exchange user account, select the Add link next to Accounts.
- Click the green plus (+) button next to the User list to add another user.
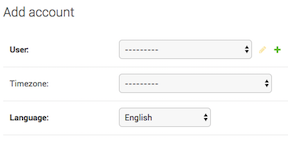
- Create a username and password that will be remembered by the user. Confirm the password and select the Save button.
- Select the timezone and primary language for the user from the drop down menus.
- Click the Save button to save the account.
Modify an existing account
Changing a user’s password, setting permissions, and editing their email address can all be completed in the Account section.
Edit user information
- Select Accounts in the Account menu, and click on the username whose information you’d like to modify.
- Click the pencil icon next to the username, and make the changes to the account. When you are finished, click the Save button to save your changes.
Within the Change User screen, you can update the following user information:
- Personal info - The basics
- User permissions - Designates what type of account the user has, groups the user belongs to
- Important dates
- Extended profile information - Organization, location, biography
Edit an email address
- Select Email addresses in the Account menu, and click on the user name whose email you’d like to modify.
- Update the email address, and check the box to display if the email has been verified, and if this is the user’s primary email address.
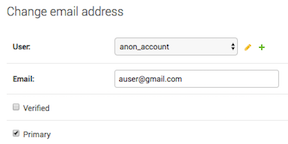
- Click the save button when you are finished, or continue modifying any additional accounts.
Delete a user account
- Select Accounts in the Account menu, and check the box next to the user account(s) you want to delete.
- Select Delete selected accounts in the Action menu, and click the Go button.
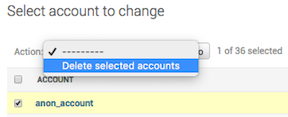
- Click the Yes, I’m sure button to verify your selection. You will be notified that the account was successfully deleted.
Signup codes
As an administrator, you are able to invite individuals to try Exchange. When you do this, a signup code is generated. This signup code is used to track trial users in Exchange. From this site, you can modify when the signup code expires, the number of times it can be used, or delete the code itself.
Invite users
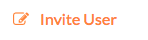
- Select Profile in your profile drop down menu, and click Invite User in the lower right corner.
Note: While this is not done in Django, you must have the required privileges to invite users.
- Type the email address of the person you’d like to invite, and provide an easy to remember username.
- Click the Invite User button when you are finished.
The guest will receive an email notifying them that they have been invited to sign up for an Exchange account.
Signup codes
You will need to return to the Django administration site to modify signup codes.
- Select Signup Codes in the Account menu, and click on the code you’d like to view.
- Make all necessary changes, and click the Save button. From this screen, you are able to:
- Modify the number of times the code can be used
- Set an expiration date for the invitation
- Add the individual who sent the invitation
- Add any notes relevant to the invitation or its recipient
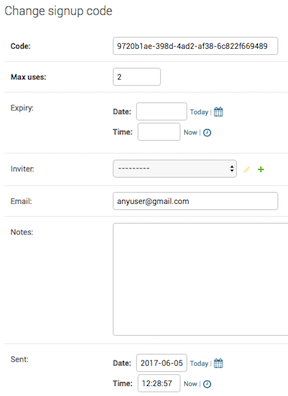
To delete the signup code, click the Delete button, and select Yes, I’m sure to verify your choice.
Actstream (Activity Stream)
Exchange uses Django Activity Stream, which creates a list of activities generated by the actions on your site, and allows you to quickly visualize who is performing what actions. An action is a description of an action that was performed (Verb) at some instance in time by some Actor on some optional Target that results in an Action Object getting created/updated/deleted.
Action events are categorized by four main components.
- Actor - The user who performed the activity.
- Verb - The verb phrase that identifies the action of the activity, such as created or deleted.
- Action Object - The object linked to the action itself, such as a layer or a map.
- Target - The object to which the activity was performed. Currently, Exchange is not using this component.
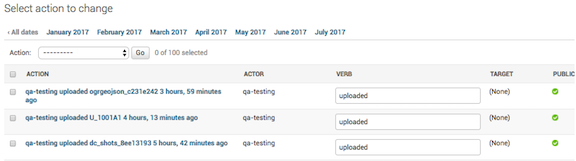
For example: admin (actor) uploaded (verb) a layer (object) 12 hours ago.
- Click Actions in the Actstream menu on the Django site administration page.

All of the actions that have taken place within Exchange will be listed, along with who performed it (actor), and what they did (verb). The target and whether or not the action is public is also listed, but they are not used at this time.
- Click on an action to view more details.
Audit trail
The audit trail is intended to display all of the activities that happen within Exchange. It tracks who performed what actions, and when. Included is detailed information about the user, such as their IP, email address, full name and their user status.
To view the audit trail, click Audit events in the Audit trail menu on the Django site administration page.

A list of all of the events that have occurred within Exchange will display. From here, administrators can filter everything for specific types of events, users, etc. using the search field. Simply type a term in the textbox, and click the Search button.
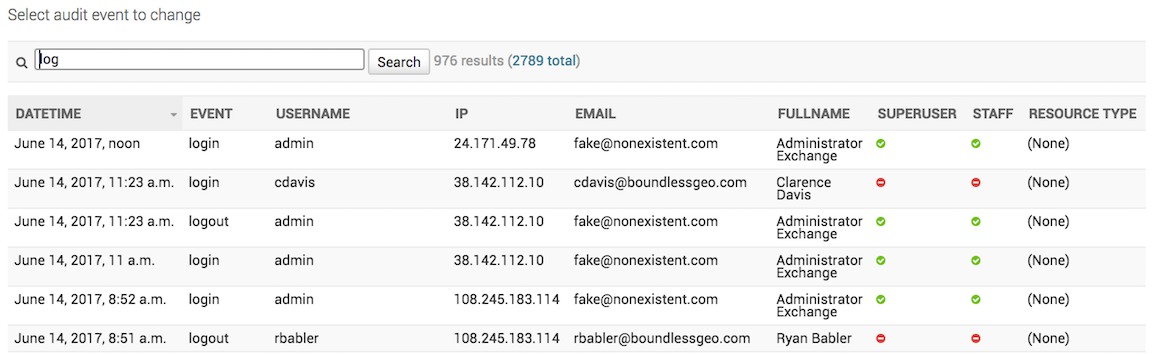
Audit trail is very similar to the Activity stream feature, but the primary difference is that with Audit trail, you are able to see when an event occurred, and from where. Activity stream tells you exactly what action has taken place.
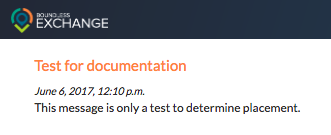
Announcements
Administrators can create short messages for all Exchange users that will be placed at the top of their screen. Their importance level, determined by the originator, can range from general to critical, and can easily be scheduled for publication.
Create an announcement
- Click the green plus (+) Add button next to Announcements.

- Provide a title for your message, and select the level of importance for your message from the Level list. Your options are General, Warning and Critical, and should be determined by the nature of the announcement.
- Type your full message in the Content textbox.
- Select the checkboxes to determine whether or not you’d like your announcement to be seen site-wide, and/or for Exchange members only.
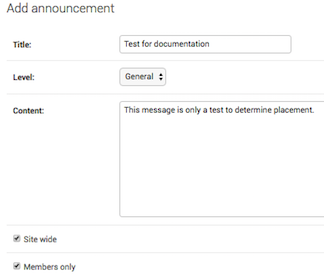
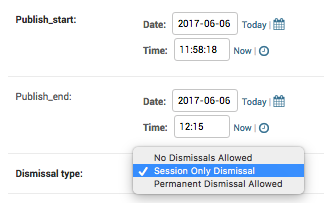
- Use the publish start and end options to create a display time limit for your message, and select a dismissal option from the menu.
- Click the Save button to create your announcement. To verify your announcement is correct, click the View on site button in the upper right corner.
Delete an announcement
- When you are ready to delete your announcement, click Announcements under the Announcements menu on the Django Site administration page.
- Check the box next to the announcement(s) you’d like to delete, and select Delete Selected Announcements in the Action menu, followed by the Go button.
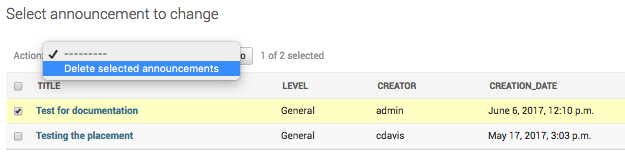
- Click the Yes, I’m sure button to verify your selection. You will be notified that your announcement was successfully deleted.
Avatars
Administrators can create, delete or manage avatars for users through the Django administration site. Valid image files are accepted (jpg, jpeg, png, tif, etc).
Add a new avatar
- Click the green (+) Add button in the Avatar menu on the Django administration page.
- Select a user from the list, and determine if this will be the main image for the account by clicking the Primary checkbox.
- Browse to the avatar image by selecting the Choose File button. Once the file name displays, click the Save button. You will be notified that the avatar was added successfully.
Change an existing avatar
- Select Avatars from the Avatar menu on the Django administration page, and click the name of the account whose avatar will change.
- Click the Choose File button to select a new avatar image, followed by the Save button. You will be notified that the avatar was successfully changed.
Delete an avatar
- Select Avatars from the Avatar menu on the Django administration page, and click the checkbox next to the name of the avatar to be deleted.
- Select Delete Selected Avatar from the Action menu, and click the Go button.
- Verify your selection by clicking the Yes, I’m sure button.
You will be notified that the avatar was successfully deleted.
Documents
The Documents section is designed to help manage documents that have been added to Exchange. This section will explain how to add new documents through Django, and how to edit and delete existing documents. All of the options in this section are available through the Documents menu on the Django Site administration page.
Add a document
- Click the Add link next to Documents on the Django Administration site Documents menu.

- Complete as much of the Add document form as possible; all of the fields on the form in bold are required.
You will see this form throughout the Django admin site. Additional fields are used in the Maps, Layers, CSW Records and StoryScapes forms.
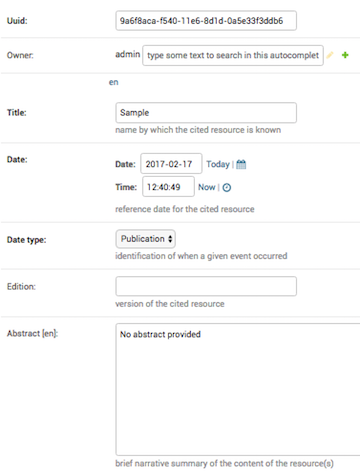
Uuid - This field is required, and is only auto-generated through the Exchange User Interface. You can find UUID generators online to help you create one for use here.
Owner - Type or select your user name from the list.
Title - Provide a title for your document.
Date/Time - The date and time will automatically populate with the document upload date. It is the reference date for the document, and does not need to correlate to the time period of the data (which will be configured later).
Date type - This will indicate whether the date/time from above is related to the document’s creation, publication or revision.
Edition - If there have been revisions to your document, you can let users know by adding a version number here.
Abstract - Let others know what the document is about with a brief narrative summary.
Purpose - Provide a short description of why the document was created.
Maintenance frequency - From the pull down, select how often modifications and deletions are made to the data after it is first published.
Keywords region - Select a region/country from the list which best fits the data. Hold down Control, or Command on a Mac, to select more than one.
Restrictions - Select from a list of limitations which can be placed on the access or use of the data. Provide a description of “Other Restrictions” in the textbox.
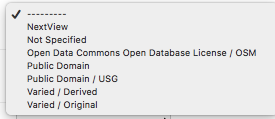
License - Select data licensing requirements from the list. Not all data has licensing requirements.
Language - Select the language used within the dataset.
Category - Data is divided into categories, which assists in the grouping and search of available geographic datasets. These categories correspond to those on the Exchange homepage.
Spatial representation type - This explains the method used to represent geographic information in the dataset.

Temporal extent start / end - Set the time period covered by the content of the dataset.
Supplemental information - Include any other descriptive information about the dataset.
Data quality statement - Provide a general description of the validity and legitimacy of the dataset. Explain any changes in the data over time.
Bounding boxes - There are four boxes to enter the coordinates for your bounding boxes. Enter the points for all of the X,Y coordinates.
Important
The following fields are automatically populated by Exchange, and should not be changed. Making edits to these fields could result in data loss.
- Srid
- CSW typename
- CSW schema
- CSW source
- CSW type
- CSW anytext
- CSW WKT geometry
- Metadata xml
- Object ID

Metadata - Click the checkboxes to ensure the metadata is uploaded and preserved. The Metadata XML will automatically generate once the document is saved.
Counts - Popular count and Share count will update as the document is viewed and shared.
Featured - Click the checkbox to feature this document on the homepage under the Featured Content section.
Is Published - This allows others to find your document when it is completed. It will make it searchable through the Exchange search.
Thumbnail URL - Enter the URL for the thumbnail for your document. This will be what users see when searching for your document in Exchange.
Detail URL - This is the number assigned to your document, and is added to the end of the Exchange URL. This can make accessing your document easier in the future; just enter the Exchange URL, followed by /document/<document number>. The detail URL is created after saving your document.
Rating - Once your document is published, others can provide a rating to let you know what they think of it.
Content type - This does not necessarily correspond to the file’s extension type, but rather the type of data in the file.
File - Click the Choose File button to browse to and change the file.
Extension - The following file types can be uploaded: .doc, .docx, .gif, .jpg, .jpeg, .ods, .odt, .pdf, .png, .ppt, .pptx, .rar, .sid, .tif, .tiff, .txt, .xls, .xlsx, .xml, .zip, .gz, .qml.
Doc type - Is the file an image, document, presentation, etc.?
URL - The URL of the document if it is external.
Keywords - Enter words or phrases, separated by commas, used to describe the subject, and can be search by other users.
- Once you have completed the form, click the Save button to add your document to Exchange.
Edit existing documents
- To edit an existing document, click the Change link in the Documents menu.
- Find the document you’d like to edit. You can do this multiple ways:
- Type all or part of the document name in the search field at the top of the page.
- Select a filter term on the right side of the page to minimize document results
- Scroll through the list of results.
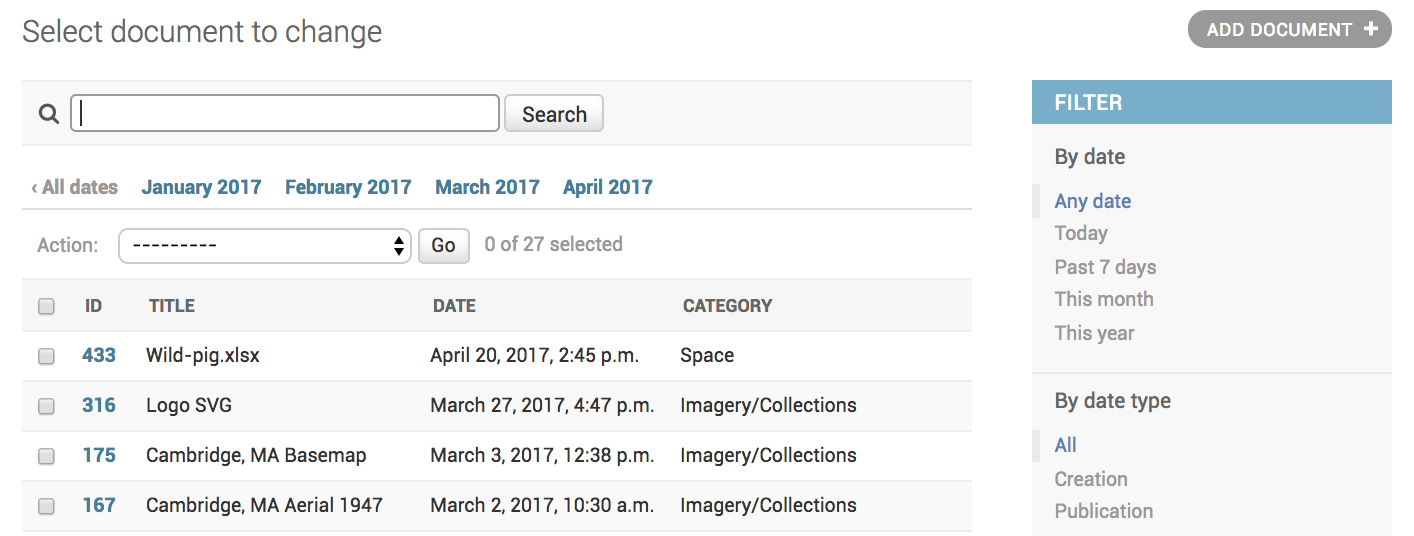
- Click on the ID number of the document you’d like to edit. The Change document page will open, and you can begin editing the metadata.
- Click the Save button once you have made all of your edits.
Delete a document
If you no longer need a document, and would like to remove it from Exchange, it can be quickly and easily deleted from the system.
- Click Change in the Documents menu to open the list of all documents.
- Click the checkbox next to the document you’d like to delete.
- Select Delete selected documents from the Action menu, and click the Go button.
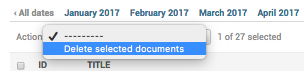
- Click the Yes, I’m sure button to verify your selection. You will be notified that the document was successfully deleted.
Your document will no longer be available in Exchange.
Groups
The Groups section of the Django administration site allows users with admin credentials to manage groups within Exchange. This section will explain how to invite individuals to groups, create or delete groups, and modify group profiles.

Create a group
- Click the Add link next to Group profiles on the Django Administration site Groups menu to open the Add group profile page.
- Provide a unique title for your group. This will also be what is used for the Slug field. The Slug is a unique identifier for your group. If your group title is comprised of multiple words, you will need to use a hyphen or an underscore to replace the spaces.
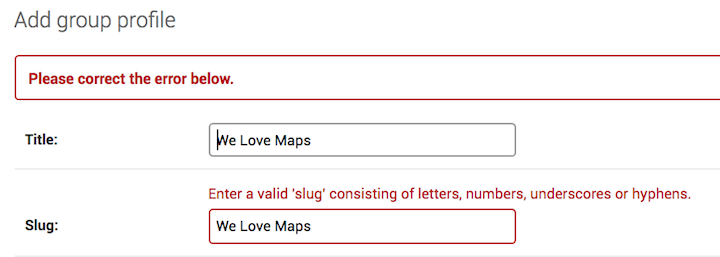
A slug is the URL friendly version of the title. For example, with the group We Love Maps, the slug would be either We-Love-Maps or We_Love_Maps. When the URL for the group is created, it becomes something like this:
http:// www.exchange.com/groups/groups/We-Love-Maps.
- Browse to an image you want to use as a logo for the group.
- Provide a brief description of the group. Explain briefly why the group was created, who the members are, or what service the group provides.
- Add an email address. This can be an email used to contact one or all of the group members, such as a mailing list, shared email, or an exchange group.
- Select the type of access you’d like users to have to the group from the Access menu. The group can be Public, Public (invite-only), or Private.

- Add any keywords that may be helpful for users to find your group, or determine if the organization is relevant to their work.
- Add members to the group by selecting Exchange users from the pull down list, and select either Manager or Member from the Role menu. If adding more than three members, to a group, select the Add another Group member link. This will add another row for an additional member.
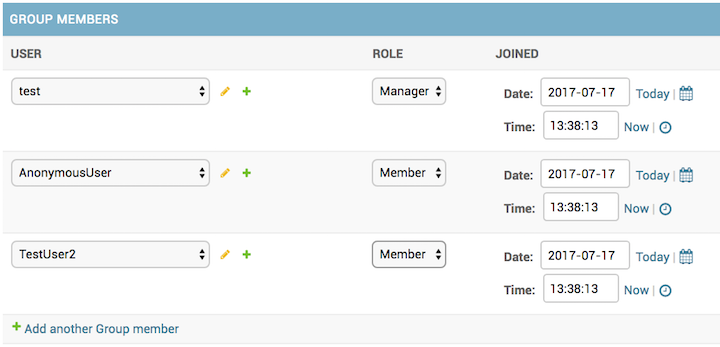
- Once all of the group members have been added, click the Save button to create the group. This will direct you to the list of existing groups. A notice will display, indicating the group profile was added successfully.
Manage groups
Update existing group profiles and modify group members through the Django site.
- Click Group profiles in the Groups menu on the Django administration site Groups menu to open the list of existing groups.
- Open the Change group profile page for a specific group by selecting on the name of the group you’d like to modify.
From here, you are able to to change the group information, add or remove group members, and change member roles.
To delete a user from a group, click the checkbox under the delete column next to their name.
- Click the Save button when you are finished to save your changes.
Delete a group
- Click Group profiles in the Groups menu on the Django administration site Groups menu to open the list of existing groups.
- Click the checkbox next to the name of the group to be deleted, and select Delete selected group profiles in the Action menu, followed by the Go button.
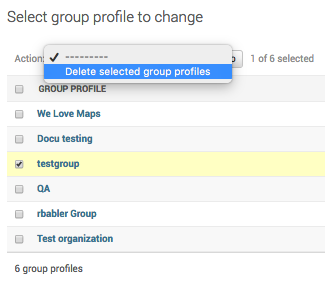
- Click the Yes, I’m sure button to verify your selection. You will be notified that you have Successfully deleted 1 group profile.
Layers
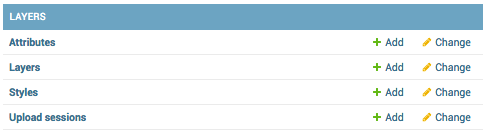
The Layers section of the Django administration site is used to maintain features for a layer. The primary function used in this section is the ability to edit individual attributes for a layer. The other options in the Layers section are not covered in this documentation.
Edit attribute fields for a layer
- Click the Layers link in the Layers menu on the Django administration page. This will open a list of all layers available on your site.
- Find the layer whose attributes you’d like to edit. You can do this multiple ways:
- Type all or part of the layer name in the search field at the top of the page.
- Select a filter term on the right side of the page to minimize layer results.
- Scroll through the list of results.
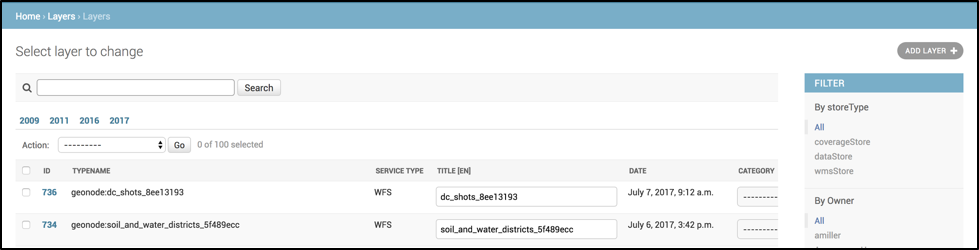
- Once you have found the layer you’d like to edit, click on the ID number. This will open the Change Layer page. Scroll to the Attributes section at the bottom of the page.
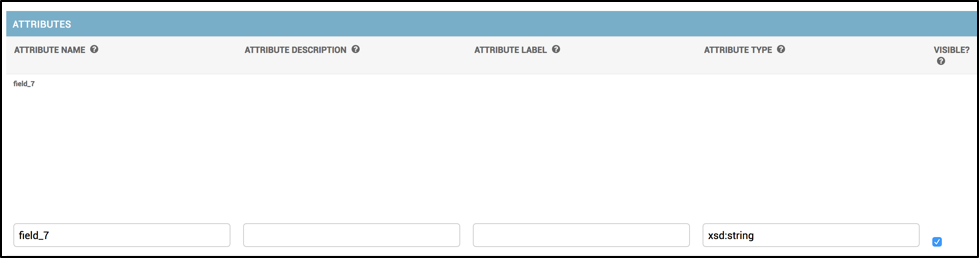
- Type the new attribute label and description in the text box. To turn visibility off/on for an attribute, click the visibility check box. Click the save button at the bottom of the page when you are finished.
Osgeo_Importer
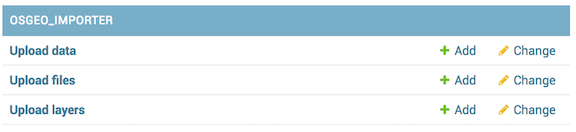
The primary use of the Osgeo_Importer section is to help Exchange admin users manage data, files and layers imported through the web user interface. This section will cover how to view and delete existing uploaded files. All of the options in this section are available through the Osgeo_Importer section on the Django Site administration page.
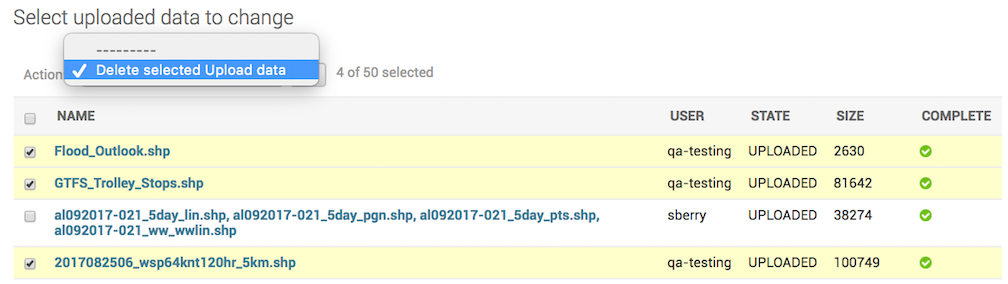
View Uploaded data
- Click the Upload data link under the Osgeo_Importer menu on the Django Administration site Osgeo-Importer menu.
Data that has been uploaded into Exchange will be listed on the page. Information is listed for the name of the data file, the user who uploaded it, the state of the file (typically will display UPLOADED), and the size of the file. A green checkmark will display, indicating the data upload was completed successfully.
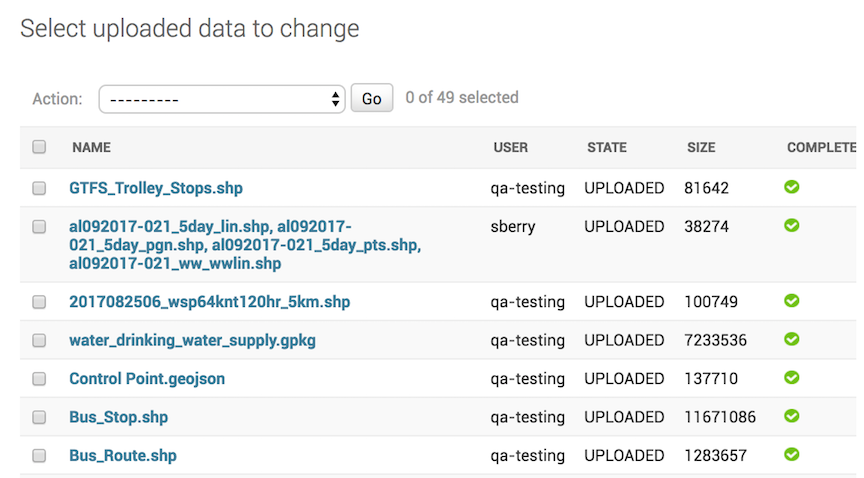
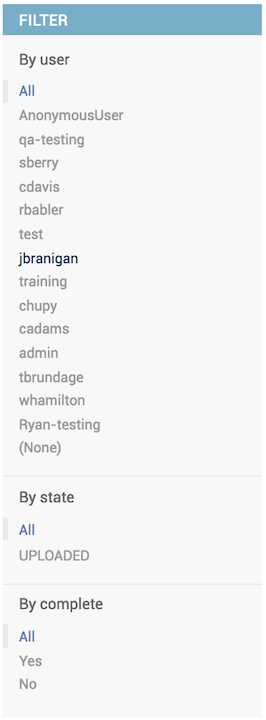
Uploaded data can be filtered by selecting one of the filter options. Available options allow you to filter by user, by state and by complete. Select on one of the links to narrow the results displayed to fit your filter criteria.
- Click on a file name to view the individual file information.
Note: These fields were populated at the time the file was imported, and should not be changed. This section should be thought of as for informational purposes only to view the status, size or file type for a file.
- Click the browser’s back arrow to return to the previous page.
View Uploaded files and Uploaded layers
- Click either the Upload files or Upload layers link under the Osgeo_Importer menu on the Django Administration site Osgeo-Importer menu.
The Upload files page will display the directory link for the file.
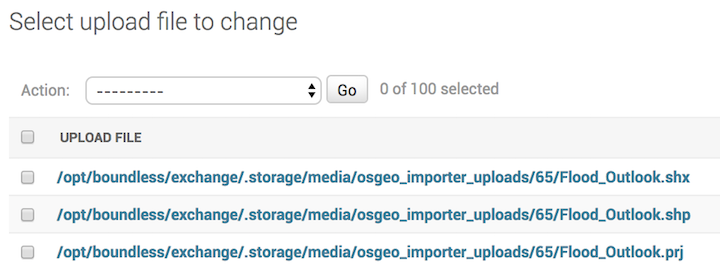
List of uploaded files
Clicking on the file link will open the Change file upload page, where you can change the uploaded file or view the file type. It is not recommended that this information is changed, as it could lead to loss of data. This is intended for reference only.
Selecting Upload layers will display the list of layers by name and feature count. The task ID will be the unique ID assigned to the layer upon upload.

List of uploaded layers
Delete uploaded data/files/layers
Users with administrator privileges are able to delete uploaded content from within the Django Administration site quickly, and easily.
- From the list of uploaded content, click the checkbox next to the name of the data/files/layers you’d like to delete.
- Select the delete option from the Action drop down menu, and click the Go button.
- Verify your selection by clicking the Yes, I’m sure button.
Working with Registry
In Exchange, there are two primary types of data that can be added to Registry, a service or a single layer. A service is two or more layers being added to the map at the same time, whereas a single layer is just an individual layer. The form is the same for either one, but you will need to have a relatively good understanding of your data in order to successfully insert your new record.
Currently, you can add the following services in Exchange:
- WMS - Web Map Service
- MapServer - ESRI Map Service
- ImageServer - ESRI Image Service
Add an individual record to CSW
Exchange users with administrator privileges are able to add CSW records through their Exchange webpage.
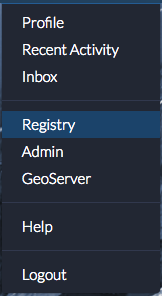
- Click on your user name in the toolbar. Select Registry from the drop-down menu to open the record form.
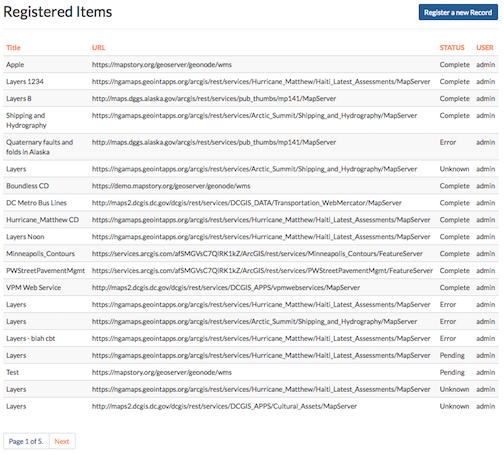
- A list of all items registered in Exchange will open, displaying their status as Complete, Unknown, Pending, or Error. Click the Register a new Record button in the top right corner to add a new record.
Click the Register a new Record button in the top right corner to add a new record.
- Complete the form with all of the necessary information.
Service URL - This is the URL address for the endpoint you are trying to add.
- Geoserver Example:
- https://mapstory.org/geoserver/geonode/wms
- ESRI MapServer Example:
- https://ngamaps.geointapps.org/arcgis/rest/services/Hurricane_Matthew/Bahamas_Latest_Damage_Assessments/MapServer
Note: Entering a MapServer url will auto-populate the available services such as WMSServer, WFSServer, FeatureServer.
- ESRI MapServer WMSserver Example:
- https://ngamaps.geointapps.org/arcgis/services/Hurricane_Matthew/Haiti_Latest_Assessments/MapServer/wmsserver
- ESRI ImageServer Example:
- https://gis.ngdc.noaa.gov/arcgis/rest/services/bag_hillshades/ImageServer
Title - This field should populate automatically. The title should be related to the data, but should also be unique enough to find when performing a search. You can change the title if you don’t want what auto-filled.
Layer Identifier - For ESRI MapServer Services, this field will be populated automatically; however, for any other service type, the name of the layer is required for this field.
Category - Select a category from the list that best describes your data.
Abstract - The abstract should provide a brief description of the data being added.
Agency - Where did the information come from? This should also auto-populate. If Exchange is unable to detect who the data belongs to from the endpoint, add the creator/agency information.
Contact Email - Please add your email address here.
Contact Phone - Please add a contact phone number here.
Gold - Select this checkbox if the data is NGA-approved content.
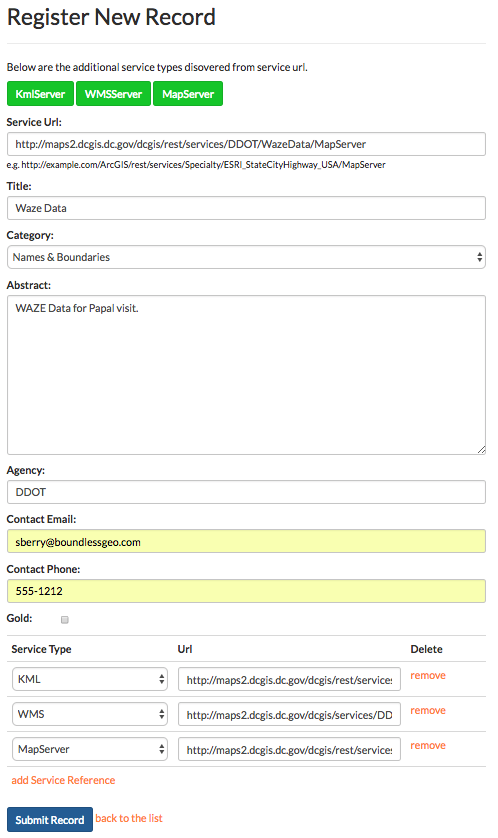
This is an example of a completed new record form.
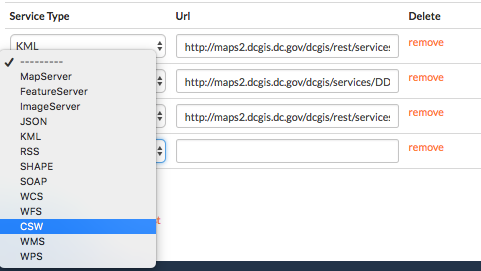
Additional services types (also called references) can be added by selecting the type from the drop down menu, and adding the URL. Service types discovered from the service URL are also listed at the top of the form.
- Click the Submit Record button to nominate record.
Note: Contact your Exchange administrator if the status does not display as Complete. They will need to take a look at your record via Django administration. Please see step 5 in the record administration section below.
For additional examples of records that have been successfully added in Exchange, please check out the Appendix.
Verify the record
Once you submit your record, you will be directed to the Registered Items page. To verify the record status in Registry, you can search for it using the Exchange search field at the top of the page, or use the Add Layer function from your map.
CSW Record Administration
Add a CSW record
Records can also be added through the Django administration site. The form there requires you to add all data manually, and does not have an auto-populate function.
- Click on your user name in the toolbar. Select Admin from the drop-down menu to open the record form.
- Click Add next to CSW Records from the Core menu on the Django administration site.

- Complete the form with all of the necessary information. All of the fields on the form in bold are mandatory.
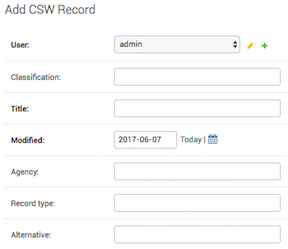
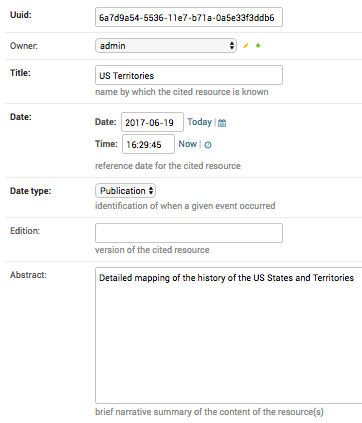
User - Select a user from the list to be the owner of the record.
Classification (optional) - Unless the data resides on a classified system, this will remain blank/UNCLASSIFIED.
Title - The title should be related to the data, but should also be unique enough to find when performing a search for data.
Modified - This field is filled in by default, but can be edited to match what is true for the data.
Agency - Where did the information come from?
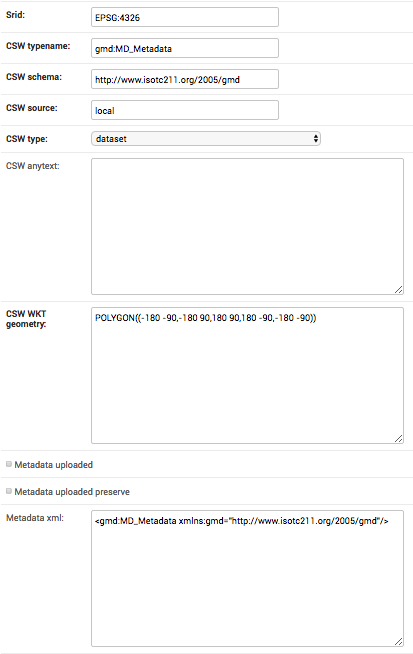
Record Type - The type field denotes what kind of data is being added.
For the services listed below, you would use the following information:
- ESRI map server - ESRI:ArcGIS:MapServer
- ESRI image server - ESRI:ArcGIS:ImageServer
- WMS Services - dataset
Alternative - An ESRI service will number each of the layers (starting with zero), and when adding data from a service, the alternative field points to the id individual layer to be pulled from that server. For GeoServer OGC services, the value for the Alternative field can be pulled from the layer name which is a string that does not contain spaces. If you leave the space blank, all of the associated layers will be added.

List of layers with ID’s for the MapServer. The layer ID for Bridge Out is ‘1’ as indicated by the value in the parenthesis.

Geoserver typically follows the format of <workspace>:<name>. The <name> portion is all that’s needed for the Alternative field.
Abstract - The abstract should provide a brief description of the data being added.
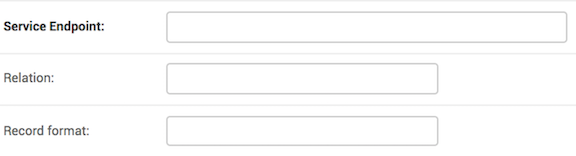
Service Endpoint - This is the URL address for the endpoint you are trying to add.
- Geoserver Example:
- https://mapstory.org/geoserver/geonode/wms
- ESRI MapServer Example:
- https://ngamaps.geointapps.org/arcgis/rest/services/Hurricane_Matthew/Bahamas_Latest_Damage_Assessments/MapServer
- ESRI MapServer WMSserver Example:
- https://ngamaps.geointapps.org/arcgis/services/Hurricane_Matthew/Haiti_Latest_Assessments/MapServer/wmsserver
- ESRI ImageServer Example:
- https://gis.ngdc.noaa.gov/arcgis/rest/services/bag_hillshades/ImageServer
Relation - This field is not currently used. It is used to associate records to one another
Record Format - This can vary depending on the kind of data being added. When registering a WMS service, format must be set to OGC:WMS.
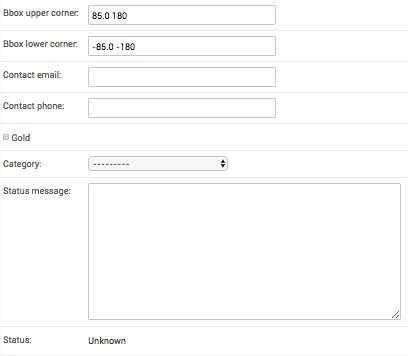
Bounding Box coordinates: Upper Corner - The bounding box defaults to an area that will cover what is being added. It is recommended to leave the default settings (85.0 180, -85.0 -180) unless you have specific requirements.
Bounding Box: Lower Corner - Same as above.
Contact Email - Please add your email address here.
Contact Phone - Please add a contact phone number here.
Gold - Select this checkbox if the data is NGA-approved content.
Category – Select a category from the drop-down menu.
- Once you have completed the form, click the Save button. You will be returned to the CSW record page, and notified that your record was added successfully.
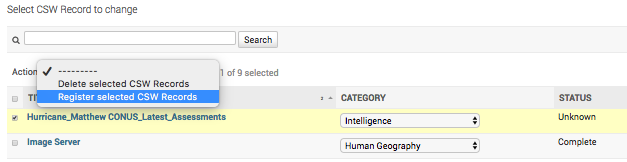
- A record added through the Django administration site will display the status as Unknown. Click the checkbox next to your record, and select Register Selected CSW Record from the Action menu. Click the Go button.
Delete a record
- Select CSW Records from the CORE menu on the Django administration site.
- Click the checkbox next to the record(s) to be deleted.
- Select Delete selected CSW Records from the Action menu, and click the :guilabel`Go` button.
- Click the Yes, I’m sure button to verify your selection.
Managing Storyscapes
Through Django, administrators are able to create, delete and manage stories.

Create a story
Build the story index
Users with administrator privileges are able to create stories through Django by clicking the Add link next to Stories in the Storyscapes menu.
- Ensure the layers you want to use for your story have previously been uploaded, and are available in Exchange.
- Fill in as much of the form as possible; all of the fields on the form in bold are required.
There are several options available through the Django administration site that are not available through the Exchange user interface. They provide a more detail for the story and its metadata, but typically require a little more knowledge of the datasets.
Uuid - This field is required, and is only auto-generated through the Exchange User Interface. You can find UUID generators online to help you create one for use here.
Owner - Select your user name from the list.
Title - Provide a title for your story. It should encompass all of the chapters that will make up your story.
Date/Time - The date and time will automatically populate with the story creation date. It is the reference date for the story, and does not need to correlate to the time period of the story data (which will be configured later).
Date type - This will indicate whether the date/time from above is related to the story’s creation, publication or revision.
Edition - If there have been revisions to your story, you can let users know by adding a version number here.
Abstract - Let others know what the story is about with a brief narrative summary.
Purpose - Provide a short description of why the story was created.
Maintenance frequency - From the pull down, select how often modifications and deletions are made to the data after it is first published.

Maintenance frequency options
Keywords region - Select a region/country from the list which best fits the data. Hold down Control, or Command on a Mac, to select more than one.
Restrictions - Select from a list of limitations which can be placed on the access or use of the data. Provide a description of “Other Restrictions” in the textbox.

License - Select data licensing requirements from the list. Not all data has licensing requirements.

License requirement options
Language - Select the language used within the dataset.
Category - Data is divided into categories, which assists in the grouping and search of available geographic datasets. These categories correspond to those on the Exchange homepage.
Spatial representation type - This explains the method used to represent geographic information in the dataset.

Available spatial representation types
Temporal extent start / end - Set the time period covered by the content of the dataset.
Supplemental information - Include any other descriptive information about the dataset.
Data quality statement - Provide a general description of the validity and legitimacy of the dataset. Explain any changes in the data over time.
Bounding boxes - There are four boxes to enter the coordinates for your bounding boxes. Enter the points for all of the X,Y coordinates.
The following fields will populate automatically, and don’t need to be changed. They are related to registry. Changing these fields without the proper information could cause problems with your story creation.
- Srid
- CSW typename
- CSW schema
- CSW source
- CSW type
- CSW WKT geometry
Metadata - Click the checkboxes to ensure the metadata is uploaded and preserved. The Metadata XML will automatically generate.
Counts - Popular count and Share count will update as the story is viewed and shared.
Featured - Click the checkbox to feature this story on the homepage under the Featured Content section.
Is Published - This allows others to find your story when it is completed. It will make it searchable through the Exchange search.
Thumbnail url - Enter the URL for the thumbnail for your story. This will be what users see when searching for your story in Exchange.
Detail URL - This is the number assigned to your story, and is added to the end of the Exchange URL. This can make accessing your story easier in the future; just enter the Exchange URL, followed by /story/<story number>. The detail URL is created after saving your story.
Rating - Once your story is published, others can provide a rating to let you know what they think of it.
Distribution URL - This is for information about online sources from which the dataset, specification, or community profile name and extended metadata elements can be obtained.
Distribution description - Provide a detailed description of what the online resource is or does.
Keywords - Enter words or phrases, separated by commas, used to describe the subject, and can be search by other users.
Add chapters
The content of the story will be chapters made from maps and layers previously uploaded into Exchange.
Note: It is recommended that you add layers via the Map Interface to ensure all of the required fields are properly completed.
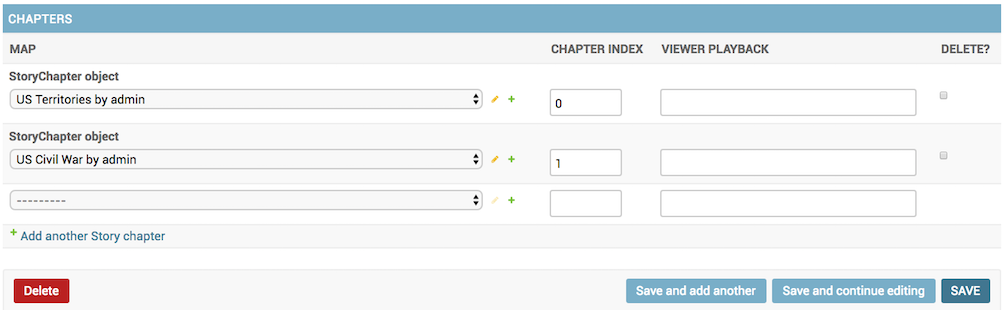
This form is nearly identical to the one used for creating your story.
- Select a map from the StoryChapter object list, and type a “0” in the Chapter Index box to indicate this will be part of the first chapter. The available maps will correspond to the maps in Exchange.
Note: The first chapter of the story must begin with 0.
You can add additional layers to a chapter by repeating this step, and ensuring the chapter index is the same for all layers in a chapter. Create new chapters by changing the chapter index number.
- Click the Edit (pencil icon) next to the map name to make any necessary edits to the metadata. Save
- When you’ve finished adding all of your chapters, and they are in the desired sequential order, click the Save button.
If you marked the “Is Published” checkbox, your story will now be available for other users to view in Exchange. Users can search for your story through the Exchange search on the homepage, or filter for it based on any of the keywords you selected.
Verify the story
To ensure your story was published, and plays properly, click the guilabel:View on Site button. The story will display, along with all of the chapter and layer details.
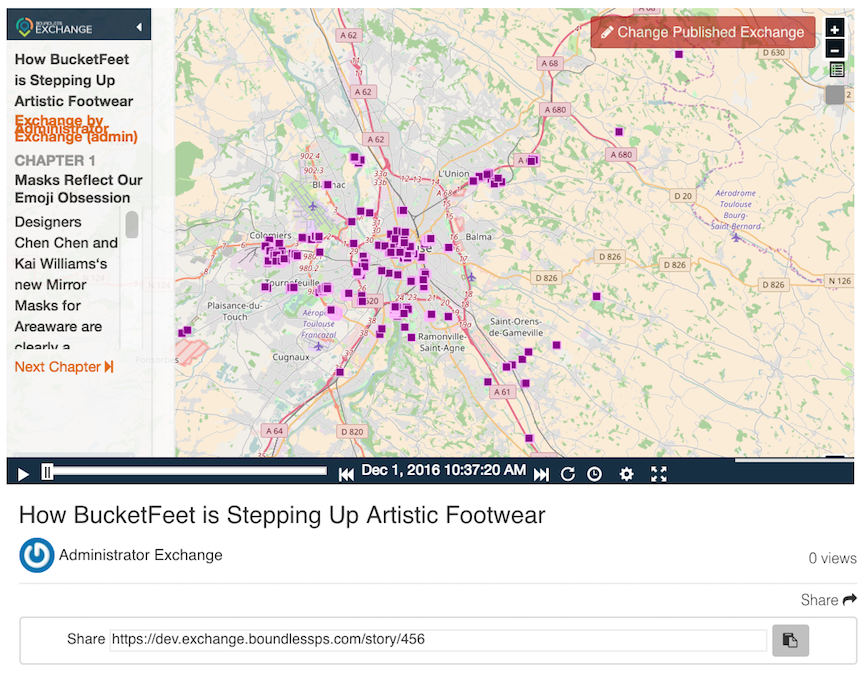
Select the Play button under the map to begin the story. The features will display according to the time attributes.
Click Next Chapter to skip ahead.
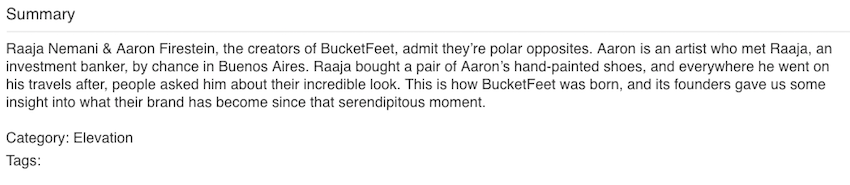
The story Summary will display all of the information provided when the story was created.
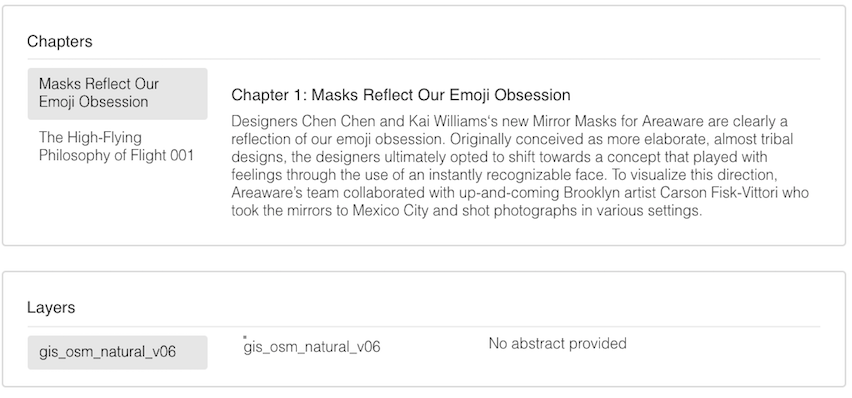
All of the chapters and layers used for the story will be listed in an index beneath the map viewer. You can toggle between the chapters to see information for the other chapters.

If you’d like to change anything about your story, click the Change Publication Exchange button. You will be returned to Exchange Composer site, and can make all edits from there.
If you checked the Featured checkbox when creating your story, you can go to the Exchange homepage, and view it by clicking on the thumbnail under the Featured Content section.
Delete a story
If a story is no longer needed, it can be quickly removed through the Django administration site.
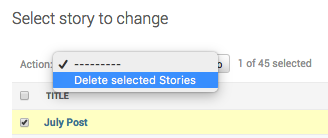
- Click the Stories link on the Storyscapes menu to open the list of stories within Exchange.
- Click the checkbox next to the story you’d like to delete. Select Delete selected stories from the Action menu, and click the Go button.
- Verify your selection by clicking the Yes, I’m sure button. The story will be removed from Exchange.